
Blog
Stripe Payment Integration in Laravel: A Step-by-Step Guide
Stripe payment integration in Laravel with Cashier: Checkout, Payment Element, signed webhooks, refunds, and SCA, plus how to test it before going live.
Muhammad Zubair Akhtar
Stripe payment integration looks easy in a tutorial and gets hard in production. Taking the card is the simple part. The hard parts are knowing for certain that a payment succeeded, handling the customer who closes the tab halfway, surviving duplicate webhooks, refunding correctly, and passing bank authentication when a card needs it. I am Zubair Akhtar, a senior software engineer in Lahore, Pakistan, and I build payment flows for Laravel applications. This guide walks through a clean Stripe payment integration in Laravel using Laravel Cashier, in the order I would build it.
If you want this built or reviewed for a live store, start at ecommerce and payment integration services. The rest of this post is the method.
What this guide covers, and what it does not claim
This guide follows the current Laravel documentation for Cashier (Stripe) and Stripe's own webhook behavior. It was written against Laravel 13.x and Laravel Cashier 16.x, which the Cashier documentation says uses Stripe API version 2025-06-30.basil, and the Stripe PHP library that Cashier requires. Cashier 16.8 supports PHP 8.1 and above.
I have not run the snippets below in a fresh project for this post, so treat them as a guide to the documented API, not as a tested repository. Before you ship, run them in Stripe test mode with the Stripe CLI as described in the testing section. Method names and the pinned Stripe API version can change between Cashier releases, so check the Cashier documentation for your installed version.
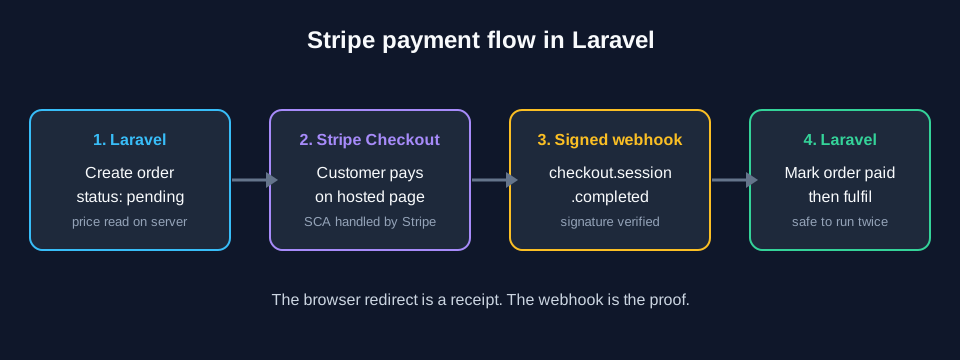
Figure 1. The flow this guide builds. Your database is only updated to "paid" after Stripe confirms the payment, not when the browser returns.
Step 1: Decide how the customer will pay
Stripe gives you more than one way to collect a payment, and the choice changes how much code you own.
| Option | What the customer sees | What you build | Good fit |
|---|---|---|---|
| Stripe Checkout | A Stripe-hosted payment page | A redirect, a success page, and webhooks | Most stores and first integrations |
| Payment Element | Stripe's payment form inside your own page | A form, a Payment Intent on the server, and confirmation handling | When the payment step must live inside your own UI |
Stored payment method and charge | Nothing at payment time | Collection of a payment method earlier, then a server-side charge | Returning customers and some subscription flows |
For most projects I start with Stripe Checkout. Card details never touch your server, the page handles many payment methods and bank authentication for you, and it is the least code to get right. Move to the Payment Element only when you have a concrete reason to keep the form on your own page.
Step 2: Install and configure Cashier
Install Cashier with Composer, publish its migrations, and migrate:
composer require laravel/cashier
php artisan vendor:publish --tag="cashier-migrations"
php artisan migrate
Add the Billable trait to the model that pays, usually User:
use Laravel\Cashier\Billable;

class User extends Authenticatable
{
    use Billable;
}
Put your keys in .env. Use test mode keys from the Stripe dashboard while you build:
STRIPE_KEY=your-stripe-key
STRIPE_SECRET=your-stripe-secret
STRIPE_WEBHOOK_SECRET=your-stripe-webhook-secret
Never commit these values. STRIPE_SECRET can move money and STRIPE_WEBHOOK_SECRET is what proves a webhook really came from Stripe. If you want a currency other than the default US dollars, Cashier reads CASHIER_CURRENCY from .env.
Create your products and prices in the Stripe dashboard before you wire up Checkout. Each price has an identifier that starts with price_, and your code refers to it by that ID.
Step 3: Create a pending order, then send the customer to Checkout
Record the order in your own database first, with a status of pending. Then hand the customer to Stripe and pass your order ID as metadata, so you can find the order again when Stripe tells you the payment worked.
use App\Models\Order;
use Illuminate\Http\Request;

Route::post('/orders/{order}/checkout', function (Request $request, Order $order) {
    abort_unless($order->user_id === $request->user()->id, 403);

    return $request->user()->checkout([$order->stripe_price_id => 1], [
        'success_url' => route('checkout-success').'?session_id={CHECKOUT_SESSION_ID}',
        'cancel_url' => route('checkout-cancel'),
        'metadata' => ['order_id' => $order->id],
    ]);
})->middleware('auth')->name('checkout');
Three details matter here:
- Authorize the order. The
abort_unlessline stops one customer from paying for, or probing, another customer's order. - Use your own price lookup. Never take a price or amount from the browser. Read it from your order or your catalog on the server.
- The
session_idplaceholder. Stripe replaces{CHECKOUT_SESSION_ID}when it redirects the customer back, so your success page can look the session up.
Step 4: Treat the success page as a receipt, not as proof
The customer lands on your success URL after paying. It is tempting to mark the order paid right there. Do not rely on it. The customer can close the tab before the redirect, lose their connection, or open the success URL by hand. Use the success page to show a friendly message, and where you do check the payment, check it against Stripe:
use Illuminate\Http\Request;
use Laravel\Cashier\Cashier;

Route::get('/checkout/success', function (Request $request) {
    $sessionId = $request->get('session_id');

    if ($sessionId === null) {
        return redirect('/');
    }

    $session = Cashier::stripe()->checkout->sessions->retrieve($sessionId);

    return view('checkout.success', [
        'paid' => $session->payment_status === 'paid',
    ]);
})->name('checkout-success');
This version only reads the session and shows a message. The decision to fulfil the order belongs in the webhook handler, which runs whether or not the customer ever comes back.
Step 5: Handle webhooks, which are the source of truth
Stripe sends your server events when something happens: a Checkout session completes, a payment fails, a refund is issued. Cashier registers a webhook route for you at /stripe/webhook and verifies the signature when STRIPE_WEBHOOK_SECRET is set.
Three setup points:
1. Exclude the webhook from CSRF protection.
Stripe cannot send a CSRF token. In Laravel 13 the Cashier docs show it in bootstrap/app.php:
->withMiddleware(function (Middleware $middleware): void {
    $middleware->preventRequestForgery(except: [
        'stripe/*',
    ]);
})
2. Register the webhook in Stripe.
Cashier includes a command that creates a webhook for the events it needs:
php artisan cashier:webhook --url "https://example.com/stripe/webhook"The list of events Cashier registers is built for subscriptions and customer updates. A one-time Checkout order also needs the checkout.session.completed event. That event is not in the list the Cashier documentation gives, so add it to the endpoint in the Stripe dashboard yourself.
3. Listen for the event and fulfil the order.
Cashier dispatches Laravel\Cashier\Events\WebhookReceived with the full payload:
<?php

namespace App\Listeners;

use App\Models\Order;
use Laravel\Cashier\Events\WebhookReceived;

class StripeEventListener
{
    public function handle(WebhookReceived $event): void
    {
        if ($event->payload['type'] !== 'checkout.session.completed') {
            return;
        }

        $session = $event->payload['data']['object'];

        if (($session['payment_status'] ?? null) !== 'paid') {
            return;
        }

        $order = Order::find($session['metadata']['order_id'] ?? null);

        if ($order === null || $order->status === 'paid') {
            return; // unknown order, or already handled
        }

        $order->update([
            'status' => 'paid',
            'stripe_payment_intent_id' => $session['payment_intent'] ?? null,
        ]);

        // Fulfil: send the receipt, grant access, queue the shipment.
    }
}
Note the $order->status === 'paid' check. Stripe can deliver the same event more than once, and your handler can also be retried after a timeout. Fulfilment must be safe to run twice. For anything heavier than a status change, put the work on a queue and return a response quickly so Stripe does not time out and retry.
Some payment methods confirm later than cards do. That is why the handler checks payment_status and why the webhook, not the redirect, decides when an order is paid.
Step 6: The Payment Element, when the form must live on your page
If you need the payment form inside your own page, Cashier's pay method creates a Payment Intent, and you confirm it in the browser with Stripe.js. The documented pattern is:
Route::post('/pay', function (Request $request) {
    $amount = 1000; // in the smallest currency unit, so 10.00

    $payment = $request->user()->pay($amount);

    $order = Order::create([
        'user_id' => $request->user()->id,
        'amount' => $amount,
        'status' => 'pending',
        'stripe_payment_intent_id' => $payment->id,
    ]);

    return view('checkout', [
        'clientSecret' => $payment->client_secret,
        'order' => $order,
    ]);
});
The view mounts Stripe's Payment Element with the client_secret and calls stripe.confirmPayment. When Stripe redirects back, verify on the server that the order belongs to the signed-in customer and that the Payment Intent has the status succeeded before you fulfil anything. As with Checkout, a webhook such as payment_intent.succeeded is the safer place to mark the order paid. The amount is always in the smallest currency unit, so a charge of 1000 in US dollars is ten dollars.
Step 7: Refunds
Cashier can refund a Payment Intent by its ID. Store the Payment Intent ID on your order when the payment succeeds, which the webhook handler above does:
$user->refund($order->stripe_payment_intent_id);Check the Cashier docs for the options your version supports, such as partial refunds. Then close the loop in your own system: mark the order as refunded, restock if needed, and tell the customer. Stripe also sends refund events by webhook, so you can keep your records correct even when someone issues the refund from the Stripe dashboard instead of your code.
Step 8: Strong Customer Authentication (SCA)
Some banks require the cardholder to confirm a payment with an extra step, usually 3D Secure. With Checkout, Stripe's page handles this for you. If you charge a stored payment method yourself, a payment can fail with an "incomplete payment" until the customer authenticates. Cashier gives you an exception for this case:
use Laravel\Cashier\Exceptions\IncompletePayment;

try {
    $payment = $user->charge(1000, $paymentMethodId);
} catch (IncompletePayment $exception) {
    return redirect()->route('cashier.payment', [
        $exception->payment->id,
        'redirect' => route('orders.index'),
    ]);
}
Cashier ships a payment confirmation page at the cashier.payment route, so the customer can finish authentication and then return to your site. The key rule is the same as before: do not treat a charge as complete until Stripe says it succeeded.
Step 9: Test it properly before going live
Test mode is free, and it is where you should find your bugs.
1. Use test keys only until the whole flow works.
2. Forward webhooks to your machine with the Stripe CLI:
stripe listen --forward-to localhost:8000/stripe/webhookThe CLI prints a signing secret for local use. Put it in STRIPE_WEBHOOK_SECRET while you test.
3. Pay with Stripe's test cards. 4242 4242 4242 4242 is the standard successful test card. Stripe's testing documentation lists cards that trigger 3D Secure, declines, and other cases, and you should run those too, not only the happy path.
4. Break it on purpose. Close the tab before the redirect and confirm the webhook still marks the order paid. Replay the same event and confirm nothing runs twice. Send a request to the webhook URL with a wrong signature and confirm it is rejected.
5. Switch to live keys last, create the live webhook endpoint, and make one small real payment that you refund.
Production checklist
- Keys live in environment variables and are not in version control.
- Webhook signature verification is on, and the live
STRIPE_WEBHOOK_SECRETis set. - Fulfilment happens in the webhook handler, and it is safe to run twice.
- Order totals and price IDs come from your server, never the browser.
- You have a plan for failed payments, refunds, and disputes, and someone owns each.
- Payment errors are logged. Cashier can send Stripe errors to a channel you choose with
CASHIER_LOGGER. - Your site serves checkout pages over HTTPS and loads quickly. Slow checkout pages lose sales, so see my Core Web Vitals guide.
- You have confirmed that Stripe supports the country where your business is registered and the currencies you plan to sell in. Check Stripe's current supported countries list before you commit to this stack.
FAQ
Is Laravel Cashier the best way to integrate Stripe in Laravel?
For most Laravel apps, yes. It wraps the common cases, including Checkout, subscriptions, invoices, webhooks, and refunds, in a package maintained by the Laravel team. If you only take simple one-time payments and want zero extra tables, you can use the Stripe PHP library directly. You then write the customer, webhook, and refund handling yourself.
Should I use Stripe Checkout or the Payment Element?
Start with Checkout. It is hosted by Stripe, handles bank authentication and many payment methods, and keeps card data off your servers. Use the Payment Element when the payment form has to sit inside your own page design, and accept that you own more of the integration.
How do I know a Stripe payment really succeeded?
Wait for Stripe to tell your server. A signed webhook, such as checkout.session.completed or payment_intent.succeeded, is the reliable signal. The redirect back to your site is only the customer's browser returning, and it can be skipped or faked.
Why does my webhook return a 400 or 403 error?
The usual causes are a missing or wrong STRIPE_WEBHOOK_SECRET, the webhook URL not being excluded from CSRF protection, or testing locally with the live secret instead of the signing secret the Stripe CLI printed.
Can I do Stripe payment integration on a WooCommerce store?
Yes, but that is a different stack. WooCommerce uses a Stripe plugin rather than Cashier. If you are still choosing a platform, read my ecommerce platform comparison.
Need a Stripe integration built or reviewed?
I build Stripe payment integrations for Laravel applications, and I review existing ones for webhook safety, refund handling, and failure paths. For stores and checkout flows, see ecommerce and payment integration. For the application behind it, see Laravel development. If you are comparing developers first, my Laravel developer hiring checklist shows what to verify before you sign.